

Learning to change a tire isn’t scary. This guide is for new drivers who want to learn this key skill. It’s perfect for road trips or when you’re stuck at the curb. Each step is simple and easy to follow.

Every driver will face a flat tire at some point. This guide will teach you how to handle it calmly. It covers tools, safety, and techniques. Follow this guide to feel more confident and prepared for any breakdown.
Key Takeaways
- Mastering how to change a tire ensures safety during emergencies.
- A step-by-step tire change requires basic tools like a jack and lug wrench.
- Practice in a safe space before facing real situations.
- Temporary spare tires need proper alignment during installation.
- Regularly check your spare tire pressure for readiness.
Why Every Driver Should Know How to Change a Tire
Knowing how to handle an tire emergency can make a stressful situation easier. This skill keeps you safe, saves money, and boosts your confidence on the road. Here’s why every driver needs to know this.
Common Causes of Flat Tires
Road hazards like nails or debris often cause flats. Other reasons include:
- Potholes damaging tire walls
- Valve stem leaks
- Over time, tread wear
Knowing these risks helps prevent future flat tire repair needs.
The Cost Benefits of DIY Tire Changes
Let’s look at the costs:
| Option | Cost |
|---|---|
| DIY emergency tire change | $0 |
| Towing + service call | $100+ |
With a spare and tools, you avoid unexpected expenses.
Building Confidence on the Road
“Preparedness reduces panic.”
Mastering this skill means you’re ready for breakdowns. Practice tire changing tips in a safe spot first. Knowing you can handle emergencies builds trust in your driving abilities.
Emergency situations become less daunting when you’re equipped with knowledge and tools. Stay ready—your wallet and peace of mind will thank you.
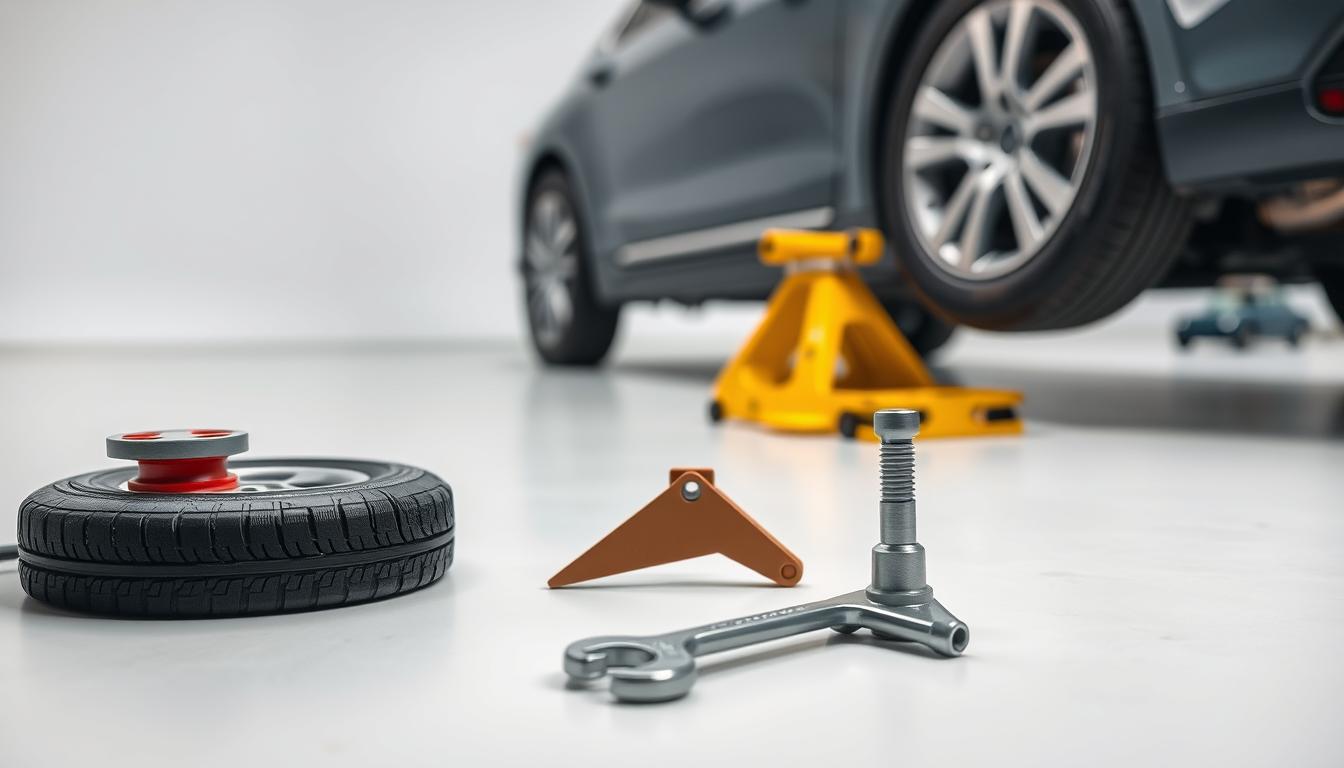
Essential Tools for Tire Changing
Before you start, make sure you have all your tools ready. This tire changing guide lists everything you need for a safe diy tire replacement. Missing any could make the job harder than it needs to be.
- Spare tire: Check its pressure every month. A flat spare is as bad as no spare at all.
- Car jack: Use the one made for your vehicle. Hydraulic or scissor jacks are the best.
- Lug wrench: A 12-inch breaker bar-style wrench loosens lug nuts quickly.
- Cloth gloves: Keep your hands safe from grease and sharp edges.
- Flashlight: Use a compact LED model with red light for safe nighttime work.
- Wheel chocks: Place them against tires for stability when jacking up the car.
- Tire pressure gauge: Check the spare’s PSI before driving.
- Old towel: Catch loose lug nuts and protect the car’s finish.
Keep these items in a bin under the spare tire. Check tools every year—broken tools are useless in emergencies. For budget kits, look at Craftsman or Irwin tools. Keep the lug wrench in your driver’s side compartment for easy access.
Being prepared is key. Having the right tools boosts your confidence. Next, this tire changing guide will show you how to use these tools step by step. Safety begins with being ready for a diy tire replacement when unexpected things happen.
Safety Precautions Before You Start
Before starting an emergency tire change, safety is key. Follow these steps to stay safe and protect yourself and others. Always put your safety first, even if it means taking more time.
Choosing the Right Location to Stop
- Find a flat, solid surface away from traffic. Avoid soft ground like gravel or uneven terrain.
- Activate hazard lights immediately to alert nearby drivers.
- Stay visible but safe: pull as far off the road as possible without blocking traffic.
Using Hazard Lights and Warning Triangles
Turn on hazard lights the moment you stop. Place warning triangles 100–200 feet behind your vehicle on highways, or 30–50 feet on city roads. Check state laws for triangle placement rules. Always face triangles toward oncoming traffic.
Proper Vehicle Positioning
Ensure your vehicle won’t roll by turning the wheel toward the curb for manual parking brakes. For automatic transmissions, shift into park. Use wheel chocks if available to add stability. These tire changing tips prevent意外滑动.
When to Call Professional Help Instead
| Scenario | Action |
|---|---|
| Steep incline or unstable ground | Call a pro |
| Severe weather (ice, heavy rain) | Wait for help |
| Physical discomfort or pain during process | Stop and seek assistance |
Safety isn’t optional. If conditions feel unsafe, contact roadside assistance immediately. Your well-being matters most.
Preparing Your Vehicle for a Tire Change
Before you start the spare tire installation, get your car ready. These steps make the process safer and easier, even if you’re new to how to change a tire.
Engaging the Parking Brake
Always start by securing the brake. This simple step stops your vehicle from rolling mid-task.
- Find the parking brake lever—commonly near the driver’s seat or between the front seats.
- Pull it up until it clicks or won’t move further.
- Test by lightly rocking the steering wheel—if the car moves, re-engage the brake.
Using Wheel Chocks
Wheel chocks block tires to prevent slipping. Place them against the tires opposite the flat one.
- Position chocks tightly against the front or back of stable tires.
- If chocks aren’t available, use rocks or bricks as alternatives.
Locating Your Spare Tire
Spare tires hide in different spots. Check your car’s manual or look in these common areas:
| Vehicle Type | Spare Location |
|---|---|
| Sedan | Trunk compartment |
| SUV | Under the truck bed |
| Hatchback | Behind the rear bumper |
| Pickup Truck | Attached to the back door or under the chassis |
Most vehicles have one of three spare types:
- Full-size spare: Replaces any wheel and drives safely for long distances.
- Donut spare: A temporary fix for short trips only.
- Inflation kits: Repair minor leaks but require professional follow-up.
How to Change a Tire: The Basic Process
Changing a tire might seem daunting, but following a clear step-by-step tire change process makes it manageable. Let’s break it down into simple stages:
- Prepare the vehicle: Engage the parking brake, block wheels, and gather tools.
- Loosen lug nuts using a wrench before lifting the car.
- Raise the car with a jack until the flat tire clears the ground.
- Remove loosened lug nuts and slide off the flat tire.
- Align the spare tire with wheel studs and hand-tighten lug nuts.
- Lower the vehicle gradually and tighten lug nuts fully with the wrench.
- Stow tools safely and drive cautiously to a repair shop.
“A spare tire is your best friend on the road—knowing how to use it builds confidence.” — AAA Safety Experts
Most tire changing guide steps take 15–30 minutes for first-timers. Practice mentally walking through the sequence, and keep a checklist in your glove compartment. Remember: each step builds on the last, so never skip safety checks. Beginners often rush, but taking it one phase at a time prevents mistakes. After mastering this flow, detailed sections ahead will show exact techniques for each numbered step. Stay calm and trust the process—you’ve got this!
Loosening the Lug Nuts Properly
Before you jack up your car, loosen the lug nuts while the tire is on the ground. This step avoids frustration and keeps you safe. Here’s how to do it like a pro.

The Correct Direction to Turn
Remember, “righty tighty, lefty loosey”? To loosen nuts, turn the lug wrench counterclockwise. Check your car manual for left-hand threads (if your car has them). Use short, firm twists to loosen the nuts.
Using Body Weight for Leverage
- Step on the wrench with your foot near the end for extra force.
- Hold the wrench handle with both hands and rock your body forward.
- Aim for a 45-degree angle to avoid slipping.
Dealing with Stuck Lug Nuts
If nuts won’t budge:
- Tap the wrench with a rubber mallet to break rust loose.
- Spray WD-40 lubricant and wait 5 minutes.
- Attach an extension pipe to the wrench for more torque.
Never use a hammer directly—this can strip nuts. Take breaks if tired; persistence pays off!
Stuck nuts are common, but patience wins. You’ve got this—your diy tire replacement skills are almost there!
Safely Jacking Up Your Vehicle
Before you lift your car, check your owner’s manual for tire changing tips. Make sure the jack is not on exhaust pipes, plastic covers, or uneven ground. Most cars use scissor jacks, but hydraulic jacks work the same way. Here’s how to do it:
- Place the jack’s base flat against the jacking point shown in your manual.
- Slowly pump or crank the jack until the tire is just off the ground.
- Check if the vehicle is stable by gently shaking it. If it rocks, lower and move the jack.
Never crawl under the car while it’s raised. If the ground is soft, put a sturdy wooden board under the jack. Don’t lift the car too high or ignore soft ground. Keep your hands away from the jack and avoid distractions. A quick emergency tire change can cause accidents. So, take your time and make sure the jack is stable. If you’re unsure, call roadside assistance.
“Jack placement is critical. Always double-check before lifting,” warns AAA’s tire safety guide.
Pro tip: Test the jack’s stability by lightly pushing on the vehicle’s body. Safety first ensures this step goes smoothly without risking injury.
Removing the Flat Tire and Installing the Spare
Once your vehicle is securely jacked up, it’s time to handle the actual spare tire installation. Follow this step-by-step tire change process to avoid mistakes and protect your wheels:
Proper Tire Removal Technique
Slide the flat tire straight off the wheel studs and set it aside. Keep loose lug nuts in a small container to prevent loss. Use a flat surface like a curb or tire cover to rest the tire safely.
Aligning the Spare Tire Correctly
Position the spare’s rim holes over the wheel studs. Gently rock the tire into place while wiping any dirt off the mounting surface. For tight spaces, use your body weight to guide the tire—avoid twisting the studs.
Hand-Tightening Lug Nuts in the Right Sequence
Start tightening lug nuts using the star pattern shown below. Hand-tighten each nut in sequence before lowering the vehicle completely. Over-tightening now can warp the wheel.
| Lug Nuts | Pattern |
|---|---|
| 4 Lug Nuts | Opposite pairs (1-3-2-4) |
| 5 Lug Nuts | Star pattern (1-3-5-2-4) |
| 6 Lug Nuts | Alternating outer pairs |
After hand-tightening, lower the vehicle slowly. Once the tire touches the ground, use a wrench to tighten nuts fully in the same sequence. Double-check all connections before driving. Remember: even a properly installed spare needs professional inspection within 50 miles.
Lowering the Vehicle and Securing the Tire
Now that the spare tire is in place, carefully lower your vehicle back to the ground. Use the jack to slowly lower it until the tire touches the pavement but keep the jack in position. This lets you adjust lug nuts if needed. Always keep your hands and tools away from the wheels during this step.

Next, remove the jack and fully tighten the lug nuts in the same cross pattern used earlier. A torque wrench helps achieve proper tightness (around 75-100 lb-ft for most cars), but if you don’t have one, tighten them as much as possible by hand then add 1/4 turn with a wrench. Over-tightening can damage bolts—stop if resistance feels excessive.
- Check alignment: Gently wiggle the tire to ensure it’s snug against the hub
- Reinstall the hubcap or center cap to protect the lug nuts
- Store the flat tire and tools safely in your vehicle
Before driving, inspect the spare tire’s pressure. Underinflated temporary spares can fail suddenly. Many drivers overlook this critical step in how to change a tire, but proper inflation ensures safe travel. Visit a repair shop as soon as possible—even “donut” spares have speed limits printed on their sidewalls.
“Always drive cautiously until the spare is replaced professionally,” advises AAA’s tire safety guide. “Never exceed 50 mph with a temporary spare.”
Congratulations—you’ve completed the final steps of this diy tire replacement process! Double-check all connections and pressure before driving. If anything feels loose or unstable, retrace your steps carefully. Remember, proper final adjustments are just as important as the initial work.
What to Do with Your Flat Tire
After putting on your spare, the flat tire’s story continues. It’s important to handle it right to stay safe and make good choices. Here’s what to do:
Temporary vs. Permanent Spare Tires
Most cars have a temporary spare (donut). These light tires have speed and distance limits (usually 50 mph/70 km and under 50 miles/80 km). Check your car’s manual for exact limits. Full-size spares offer the same performance but are heavier and less common.
| Type | Speed Limit | Distance Limit |
|---|---|---|
| Temporary (Donut) | 50 mph | 50 miles |
| Permanent Spare | Same as regular tires | No restriction |
Getting Your Flat Tire Repaired
- Puncture repairs: Small holes in the tread might be fixed with flat tire repair kits. But, avoid damage to the sidewall or deep cuts.
- Costs: Repairs usually cost $15–$50. Replacing the tire can cost $100–$200+ or more, depending on your car.
When to Replace Instead of Repair
Replace your tire if:
- Sidewall cracks or bulges show up (these can burst at high speeds.)
- The puncture is bigger than ¼ inch or in the sidewall.
- The tread depth is less than 2/32nds (use the tire maintenance penny test.)
Always have a pro check both the flat and your spare. Donuts can wear out over time, so check their age (look for a date code on the tire’s sidewall.)
Tire Maintenance Tips to Prevent Future Flats
Regular tire maintenance helps avoid flats and makes tires last longer. By following these easy steps, you keep your car safe and save money over time.
“A quick monthly check can prevent 80% of flat tires,” says AAA automotive experts. “Small issues spotted early avoid big headaches later.”
- Check tire pressure monthly using a gauge. Aim for the PSI listed on your car’s door placard, not the tire sidewall.
- Inspect tires weekly for nails, cuts, or bulges. Remove debris stuck in treads immediately.
- Rotate tires every 5,000-7,000 miles. This evens wear and prevents uneven tread damage.
Use a penny to test tread depth. Place it upside-down in the grooves—if Lincoln’s head stays visible, replace tires soon. Schedule wheel alignments yearly to correct misalignment causing uneven wear.
Seasonal changes matter too. In winter, monitor pressure as temps drop 1 PSI per 10°F. Summer heat speeds tread degradation—avoid parking on hot pavement if possible.
These habits turn small efforts into big savings. Proper tire maintenance reduces the need for emergency tire changing guide use. A 5-minute monthly check could save hours stranded on the roadside!
Conclusion
Learning to change a tire is not just a skill. It’s a way to stay safe in unexpected situations. This guide has shown you how to do it, from finding your spare to tightening the lug nuts right. Always be prepared: keep your tools handy and practice in a safe area.
Even the most skilled drivers can get a flat tire. But knowing how to change it can make you feel safer. It helps you stay calm when you need to change a tire.
Always put safety first. Make sure your car is on a flat surface, hazards are on, and you’re wearing gloves. If it’s too hard, call for help. Remember, temporary spares have speed limits, so get your car fixed soon.
Teaching others how to change a tire makes everyone safer. Keep this guide handy and review it often. With practice, you’ll be ready for anything the road throws your way.
FAQ
How do I know if I have a flat tire?
Look for signs like a drop in tire pressure or a change in how your car rides. Also, check for bulges, cracks, or punctures on the tire. If you see any, check your tires right away.
What tools do I need to change a tire?
You’ll need a spare tire, a jack, and a lug wrench. It’s also good to have gloves, a flashlight, a tire pressure gauge, and wheel chocks for safety.
Can I change a tire on my own?
Yes! With the right tools and knowledge, anyone can do it. Our guide walks you through it step by step, making it easy for beginners.
What if I’m stuck on the side of a busy road?
If you’re on a busy road, stay safe first. Pull over to a safe spot and turn on your hazard lights. If it’s not safe, call for help.
How do I safely jack up my vehicle?
Find the right jacking points in your owner’s manual. Place the jack correctly. Always use the jack smoothly and never stand under a car on a jack.
How should I tighten lug nuts?
Hand-tighten the lug nuts in a star pattern after putting on the spare tire. Then, tighten them securely with a wrench once the car is back on the ground, again in a star pattern.
What do I do with my flat tire after changing it?
Take your flat tire to a tire repair shop to see if it can be fixed. Check the damage; small tread punctures can often be repaired, but big damage or sidewall issues might need a new tire.
How can I prevent future flat tires?
Regular tire care is key. Check tire pressure, look for damage, rotate tires, and ensure they’re properly aligned.
What are the differences between a full-size spare and a temporary spare?
A full-size spare is the same as your regular tires and can be driven on for a long time. A temporary spare (or donut) is smaller, meant for short distances, and has speed and distance limits.


